

[Last Updated Thursday May 8, 2026 at 11:36 a.m.]
We know the ELMS-Canvas outage has impacted teaching, learning, grading, and access to course materials. We have appreciated your patience through this unprecedented time. Some of the following guidance may still be helpful as you navigate finals week.
Communicate With Your Students
Communicate with your students through ELMS announcements or through any of these alternative, approved communication platforms to reassure them of the plan for finals.
Create An Email List - Based on Your Course Roster
Four Steps to Create and Manage Email Lists Based on your Course Rosters
If you have questions about these directions, please see the more detailed instructions here.
1.) First log into the course space management system and select Coursemail from the left navigation pane. Here you will select the appropriate term, click Load Courses From SIS, and select course sections to generate an email list based on your course rosters. NOTE: You will need to generate an email list for each course individually.
Have multiple sections? To create a single group email for all sections associated with a single course, press the CTRL (Windows) or CMD (Mac) key and select each section listed in the Select Section(s) menu. To create a separate group email for each section, Select one section only, then repeat the course/section selection process for each desired section email list.
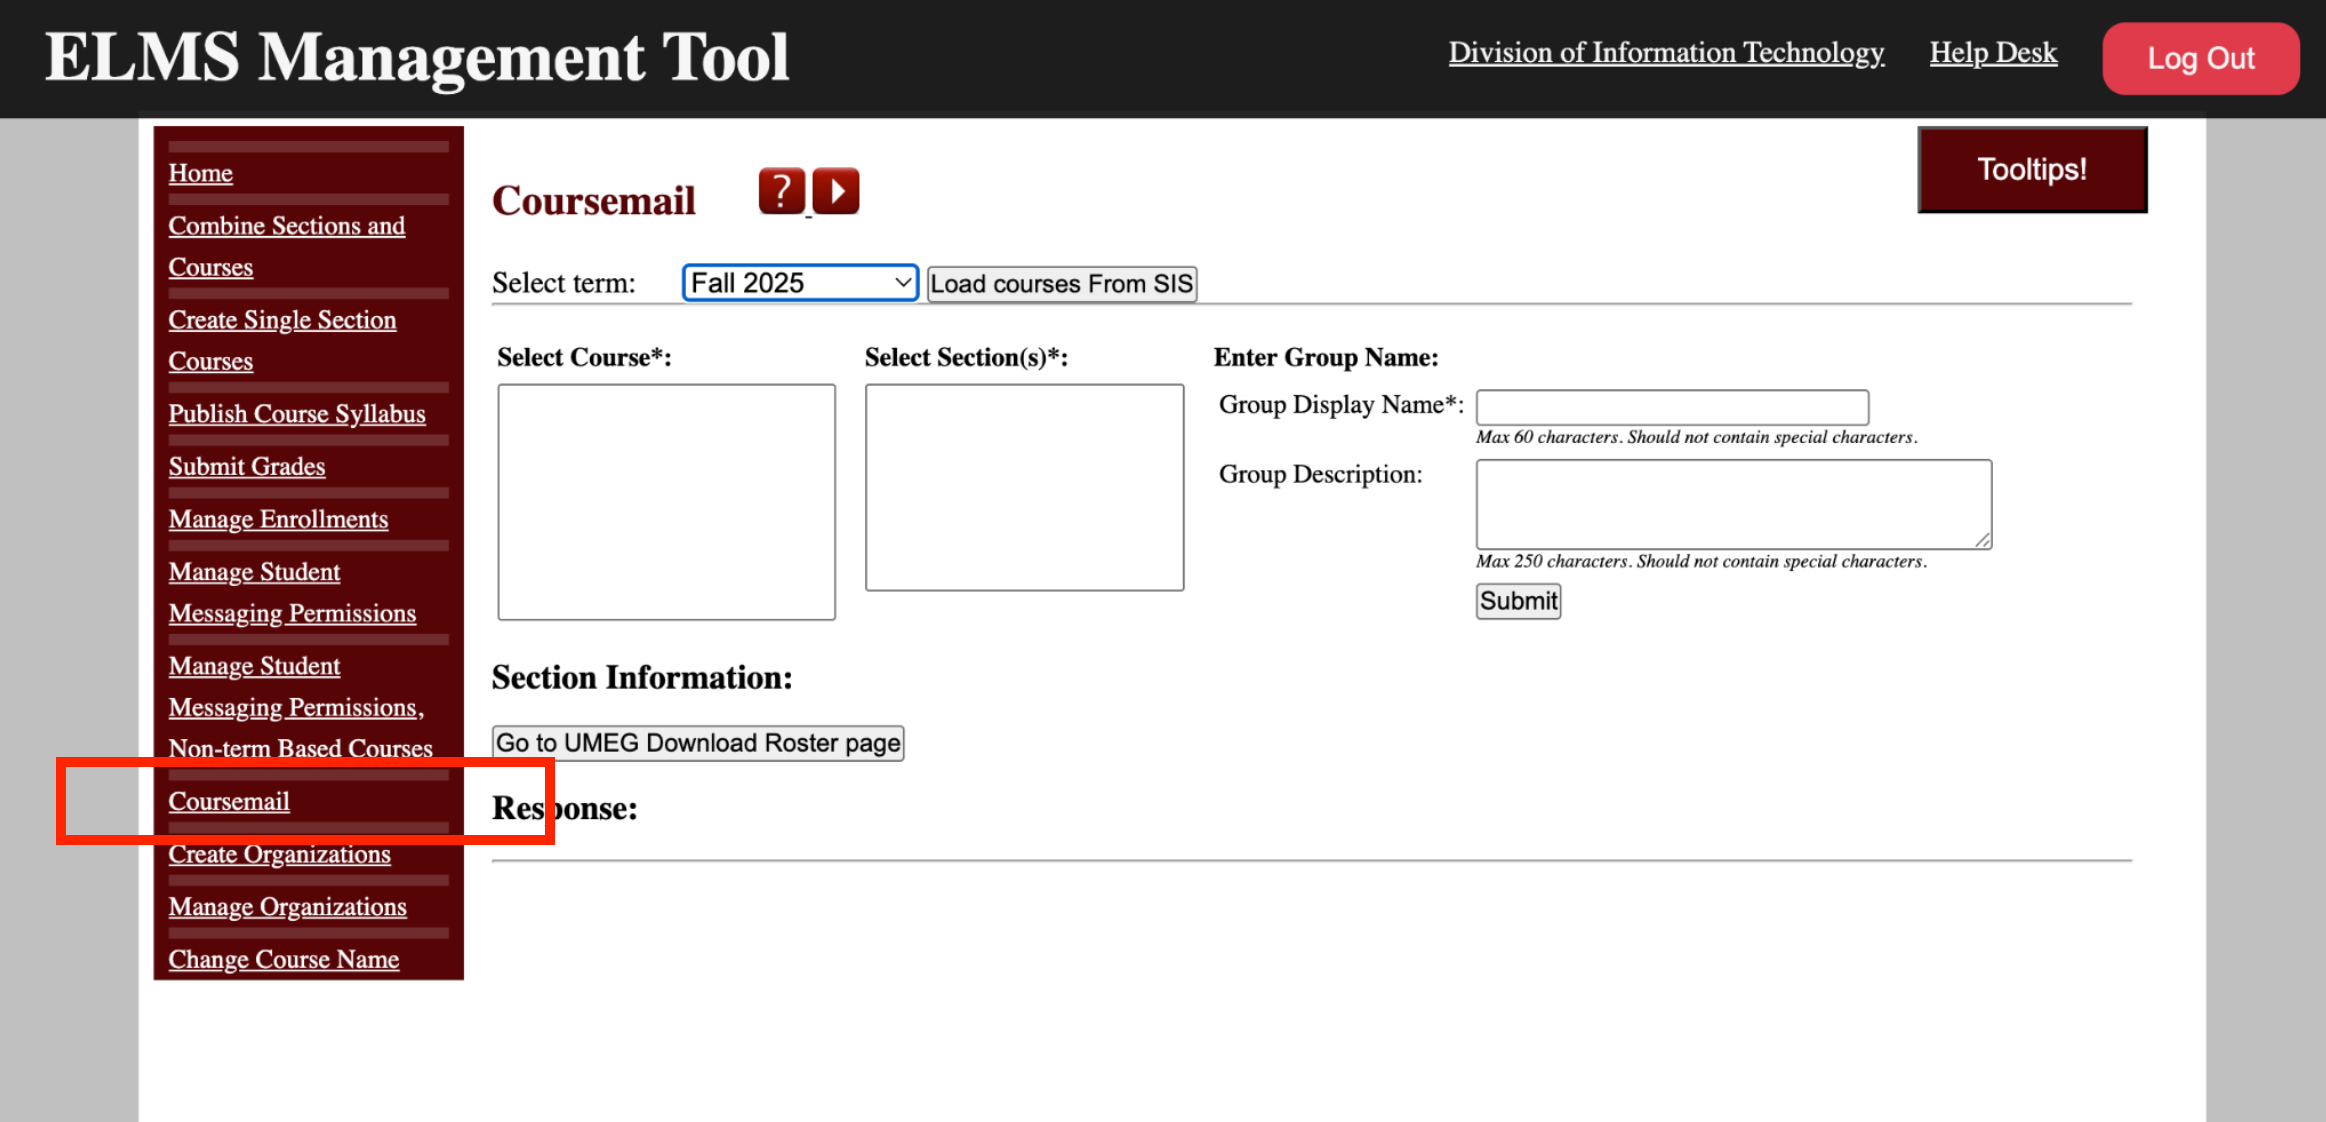
2.) Customize the Email Group Display Name
Customize an email Group Display Name, which functions as the group's email identity. Names are limited to 60 characters and should not include special symbols. Select Submit to request email list creation.

3.) Send Mail from Your UMD Account
Once you get a confirmation email that your list has been created, you may use it to email your students. All teachers, co-instructors, and TAs are enrolled in the list as managers. By default, only managers can send messages to members. To ensure successful delivery, you must send emails to these lists specifically from your @umd.edu Google Workspace email account.
To send an email to an email list from your UMD Gmail account, type the name of the list (e.g., BSOS228V-email) into the To field. Then all students will receive an email.
4) Perform Advanced Management via Google Groups
For advanced management tasks, such as inviting guest instructors or changing member permissions, log into the Google Groups interface with a UMD Gmail account. If you need to modify the course sections associated with a list, you must delete the existing group and recreate it. A Google Group is created automatically when a Coursemail list is created. Visit How to manage a Coursemail list in Google Groups for more.
For in-depth instructions, visit Create and Manage Coursemail Lists.
For a short video version of these steps, visit the How to Create Coursemail Email List Video.
Use Zoom As Planned
UMD Zoom remains available. Even meetings that were scheduled through ELMS-Canvas will continue to function. These session links can be shared directly with students via email.
Direct Students to Course Materials
As appropriate for your course, remind your students where they can access your course materials as they prepare for finals. This may include ELMS files, or locally-stored copies of your course materials that may exist on your computer, departmental drives, OneDrive, Google Drive, or other approved storage locations.
Students are also able to access eTextbooks and Courseware products, such as Pearson MyLab, by going directly to the publisher link and logging in using their student credentials. Reference materials are still available from our UMD Libraries.
Share files using Google Drive
Here is a three-step process for creating and sharing a Google Drive folder with your students, assuming you have already created a Coursemail list (Google Group) for your course roster, as described in the previous instructions.
- Create the Course Materials Folder
- Go to drive.google.com.
- Click + New and select New folder to create a dedicated folder for your course materials. Give it a clear, recognizable name (e.g., "UMD101 Course Materials - Spring 2026").
- Share the Folder with Your Coursemail Email List
- Right-click the newly created folder and select Share.
- In the "Share with people and groups" box, type the Coursemail email address (Group Display Name) for your class.
- Ensure the permission level is set to Viewer so students can access and download the materials but cannot edit or delete them.
- Click Send.
- Alternative to Coursemail: Share a link to the Drive folder with your students directly and ask that they ‘Request Access’ to the folder. You will need to grant access individually.
- Communicate the Link to Students
- Copy the sharing link from the share dialog box.
- Send an email to your Coursemail list providing the direct link to the Google Drive folder, along with any necessary instructions for accessing the materials.
Share files using UMD Box
Here is a three-step process for creating a folder and securely sharing materials with your students using UMD Box. This method restricts access to only those with a UMD Box account.
- Create the Course Materials Folder in UMD Box
- Access your UMD Box account by visiting https://umd.box.com and signing in with your Directory ID and password.
- Create a new folder dedicated to your course materials.
- Generate a UMD-Restricted Share Link
- Select the folder and enable Shared Link.
- Set the sharing type to People in your Company. This ensures access is restricted to people from UMD. Note that anyone from UMD who has the link will be able to view the content of the folder
- For the link settings, select View and Download rights so students can save the materials.
- Alternatively you can share the folder or file with students via their individual email addresses. You will need to type their addresses into the field of the Share dialog box and invite as Viewer.
- Distribute the Link to Students
- Copy the generated shared link.
- Communicate this link to your students, such as by sending it to your Coursemail list.
Access Pearson Materials
Students can still access their Pearson course materials and continue completing coursework by logging in directly to Pearson. Please send this message out to your students:
Temporary Access Update for Course Materials
Due to a recent Canvas system issue, you may have difficulty accessing course materials through Canvas at this time.
You can still access all Pearson course materials and continue completing assignments by logging in directly to Pearson. Please follow these steps:
- Log in here:
 www.pearsonmylab.com
 - Sign in with your Pearson username and password
- Use “Forgot password” if you need to reset it
- Click into our course
All assignments, study tools, and resources within Pearson remain available while Canvas access is being resolved. Please continue completing your coursework there.
Continue Collecting Assignments
Assignments may be collected through ELMS as planned, or you may elect to use Google Drive or UMD Box to set up folders and collect assignments from students directly. If possible, you may still consider delaying assignment deadlines, quizzes, exams, and other course activities, and adjust due dates when ELMS-Canvas is restored.
Collect Assignments/Assessments Using Google Drive
Here is a three-step process for setting up a Google Drive folder to collect assignments from students using Google Forms. This method ensures each student's submission is stored in your Drive without allowing them to view files uploaded by others.
- Create a New Google Form to Collect Files
- Go to Google Forms and start a new form.
- Add a question and select File upload as the response type.
- A new folder will automatically be created in your Google Drive to hold all submissions for this assignment.
- Configure Submission Settings
- Customize the form with a clear title and instructions (e.g., "History 101: Assignment 2 Submission").
- Use the settings in the form to set restrictions, such as allowing only specific file types (like PDF or Doc) and limiting the maximum file size.
- Verify that the form is set to "Collect email addresses" so you can easily track which student submitted each file.
- Share the Form Link with Students
- Click the Send button in the top right corner of the form.
- Select the link icon to get the shareable URL.
- Copy this unique link and distribute it to your students (e.g., via your Coursemail list) for them to upload their assignments.
Collect Assignments/Assessments Using UMD Box
Here is a three-step process for setting up a UMD Box folder to securely collect assignments from your students using the File Request feature. This method allows students to upload files without needing to log in or access the folder's contents.
- Create the Folder and File Request Link
- Log into your UMD Box account at https://umd.box.com.
- Navigate to or create the dedicated folder where you want the assignments to be uploaded.
- In the Sharing pane on the right, find File Request and select Create Link. You may wish to modify the Settings to require submitters to log into UMD Box.
- Customize the Submission Form
- Select Edit to customize the title of the request (e.g., "Submit Assignment 1").
- Optional: Select Add a Field at the bottom of the window to include a required Email Address or a File Description field, which can help track submissions.
- Publish and Distribute the Link
- Select the Share button to publish the form, which will make the unique upload link active.
- Copy the generated link and send it to your students, such as through your Coursemail list, with instructions to upload their documents. This feature is effective for streamlining the workflow of collecting information without giving users sharing rights to the folder.
Now That ELMS-Canvas Is Working Again
Be flexible with submission expectations surrounding this disruption.
Re-establish Expectations and Report Issues
Re-establish Expectations and Report Issues
- Communicate updated expectations and timelines clearly to students.
- Verify that gradebook entries, assignment submissions, and integrations are functioning as expected after restoration.
Resources:
Update Course Settings, Due Dates, and Requirements
Update Course Settings, Due Dates, and Requirements to Match Your Expectations
- Review course settings, assignment due dates, availability dates, and module requirements to ensure they still align with the adjusted course schedule.
- Extend deadlines and reopen assignments or quizzes as appropriate to provide students adequate time to complete coursework.
Resources:
- How do I bulk update due dates and availability dates as an instructor?
- Additional Instructions for Managing Assignments
If you have any questions or encounter any issues, please contact the IT Service Desk by visiting itsupport.umd.edu.
Continue using gradebook and UMEG for grading
Check Any App Integrations
Due to the Canvas security incident, many app connections were reset or terminated. Upon first access after service is restored, high-use tools, like Zoom, Panopto, and Respondus will be teaken care of but if you have any unique integrations you may need to reauthorize those apps to work with your account. This is expected behavior, and you may proceed to use campus-approved apps.
Below is an example of what a "need to reauthorize" message will look like. The image will vary depending on the tool, but should include the name of the app and your account information. 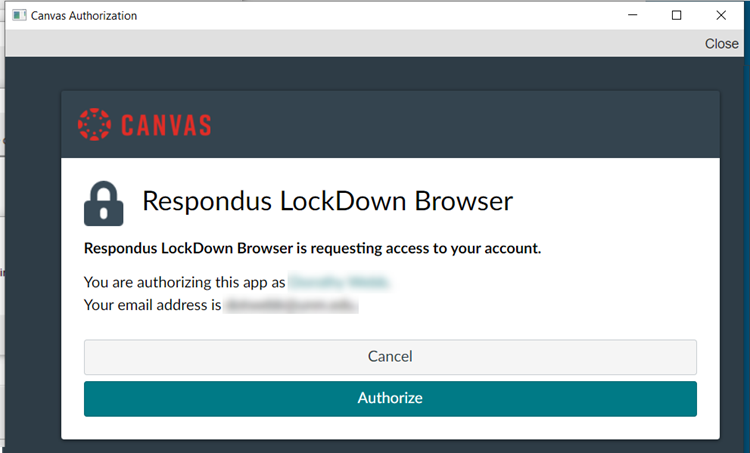
Get Incident Updates
DIT will normally share updates about system status using the IT Support System Status page. You can Subscribe to IT Alerts to get notifications to your email when alerts are posted on this page. In addition, during this outage of ELMS-Canvas, up-to-date information will also be available via the main DIT website.
Need Assistance?
Contact itsupport@umd.edu for technology support or tltc@umd.edu for teaching support.
Notes for Future:
Best Practices for Preserving Course Materials
Instructors and students are encouraged to follow best practices in keeping additional documentation of critical asserts. Below are a few recommendations you could consider.
Download Grades
Download Grades
To preserve the current grades in ELMS-Canvas, please follow the steps in How do I export grades in the Gradebook? This will allow you to download grades as a CSV file to your local computer. We recommend selecting Export Entire Gradebook.
Download Files
Download Files
- Download Student Submissions - To download all student submissions (file upload only) for an assignment, please follow How do I download all student submissions for an assignment?
- Download Course Files - To download all ELMS-Canvas course files, please follow How do I download a file or folder? For a bulk download, we recommend placing all files in a single folder, then following the provided steps to download the folder as a ZIP file.
- Print Pages and Discussions - To download content in an ELMS-Canvas course, please follow these steps:
- Navigate to the Page or Discussions you want to download.
- In the browser, open the print option by selecting File > Print or using the keyboard shortcut Ctrl + P (Windows) or Cmd + P (Mac).
- Using the browser print options, you can either print directly to a printer or to a PDF file.
Print Quizzes or Exams
Print Quizzes or Exams
- New Quizzes - If you are using New Quizzes, you can download a printable version as a blank quiz or with answers. To download, follow How do I print a quiz in New Quizzes?
- Classic Quizzes - If you are using Classic Quizzes, please follow these steps:
- Navigate to the Quizzes page of your course.
- Select the Quiz you want to download.
- Select the Preview Mode. This opens the test in the “student view,” with the questions and answer-entry area listed.

- In the browser, open the print option by selecting File > Print or using the keyboard shortcut Ctrl + P (Windows) or Cmd + P (Mac).
- Using the browser print options, you can either print directly to a printer or to a PDF file.
Export a course
Export a Course
ELMS-Canvas allows instructors to export their course content as a backup. This export creates a Canvas-supported file that can be re-imported into Canvas if needed. Please note that this file format is not intended for viewing or use outside of Canvas, and should be saved only for backup and course recovery purposes.
Resources:
Encourage Your Students to Keep Assignments Copies
Students may be able to download files they have uploaded as assignment submissions in ELMS-Canvas. This option only applies to submitted files, and availability may vary depending on the assignment and course settings. To download assignment submissions, please follow the steps in How do I download assignment submissions from all my courses?